6 Proven Pipelining Methods Phoenix Homeowners Trust
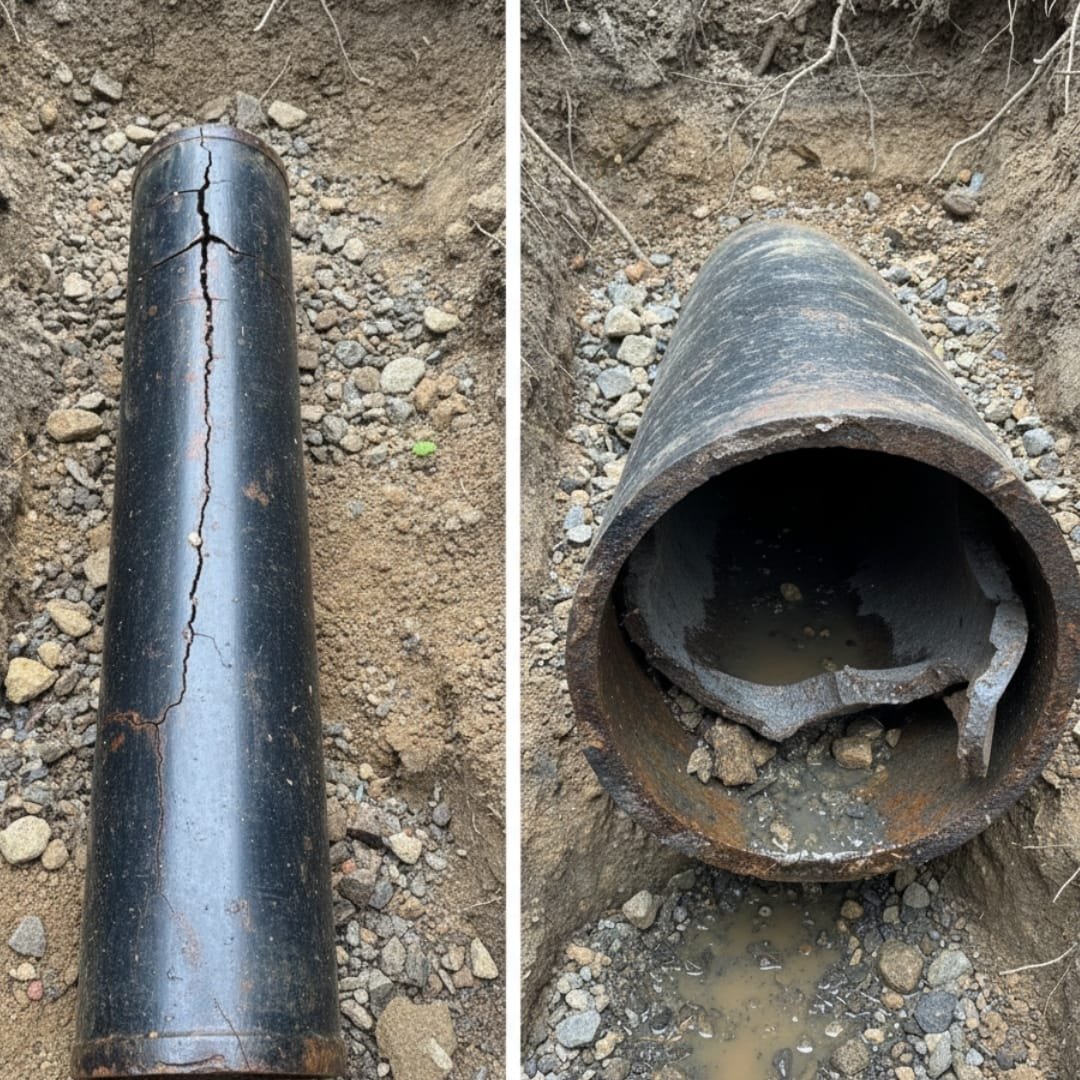
Trenchless pipelining refers to a set of techniques for repairing or replacing pipes from the inside, without digging long trenches or demolishing walls. Instead of excavating to remove old pipes, technicians rehabilitate them in place by installing a new lining or pipe within the existing one. This approach has become a preferred alternative to traditional pipe replacement because it dramatically reduces disruption. Key benefits of trenchless pipelining include minimal excavation (often just small access points instead of large trenches), significant cost savings on landscape or property restoration, and faster project completion times. Homeowners and facility managers appreciate that trenchless pipelining can fix aging sewer or water lines with far less mess and downtime than a conventional dig-and-replace job.
Homeowners and facility managers appreciate that trenchless pipelining can fix aging sewer or water lines with far less mess and downtime than a conventional dig-and-replace job.
In the Phoenix Valley (Mesa/Phoenix, Arizona), where hard soils and established landscapes make digging especially costly, these trenchless methods are an invaluable solution. Whether it’s a residential sewer under a landscaped yard or a water service line running through a school campus, pipelining offers a less invasive, time-efficient repair. This guide will explain all the major pipelining methods – how they work, pros and cons, and when to use each – so you can make informed decisions about restoring your sewer or water pipes.
Overview of Trenchless Pipelining Methods
Several trenchless pipelining methods are available today, each suited to different scenarios. Below is a quick overview of the most common pipelining methods (we will dive into details for each in the next sections):
- Cured-in-Place Pipe (CIPP) Lining: A resin-saturated flexible tube is inserted into the old pipe and cured in place to form a new, solid pipe lining. It creates a pipe-within-a-pipe without excavation. Variations include inversion lining (using air or water pressure to insert the liner) and pull-in-place installation, with curing by hot water, steam, or UV light.
- Pull-in-Place Lining: A subtype of CIPP where the liner is pulled through the pipe from one access point to another, then inflated and cured. Useful for short pipe sections or when two access points are available.
- Pipe Bursting: A trenchless replacement method (not a lining per se) where a bursting head breaks apart the old pipe while pulling in a brand-new pipe in its place. Ideal for severely damaged or collapsed pipes that cannot be lined.
- Slip Lining: One of the oldest trenchless methods – a slightly smaller new pipe is slid into the old pipe and the gap is grouted closed. Effective but it reduces the pipe diameter, so it’s mainly used in larger pipes or culverts.
- Spray-Applied Epoxy Lining: Also known as spray-in-place pipe (SIPP) coating. An epoxy or polymer resin is sprayed onto the interior of the pipe to create a thin new lining. Often used for water lines (e.g. epoxy pipe lining or the ePIPE® process) to stop leaks and corrosion without replacing the pipe.
- Mechanical Point Repair (Spot Repair): A targeted repair for a single bad spot in a pipe. A specialized sleeve (often stainless steel with a rubber seal) is inserted to the damaged section and expanded to permanently patch the leak from inside. This is great for fixing isolated cracks or joint leaks without relining the entire pipe.
In the sections below, we’ll explore each method in detail – how it works step by step, its pros and cons (cost, lifespan, disruption, size limits, etc.), and the best use cases for each technique (residential vs. commercial, small vs. large diameter, sewer vs. water lines). We’ll also compare these methods side-by-side and answer frequently asked questions about trenchless pipelining.

Cured-in-Place Pipe (CIPP) Lining
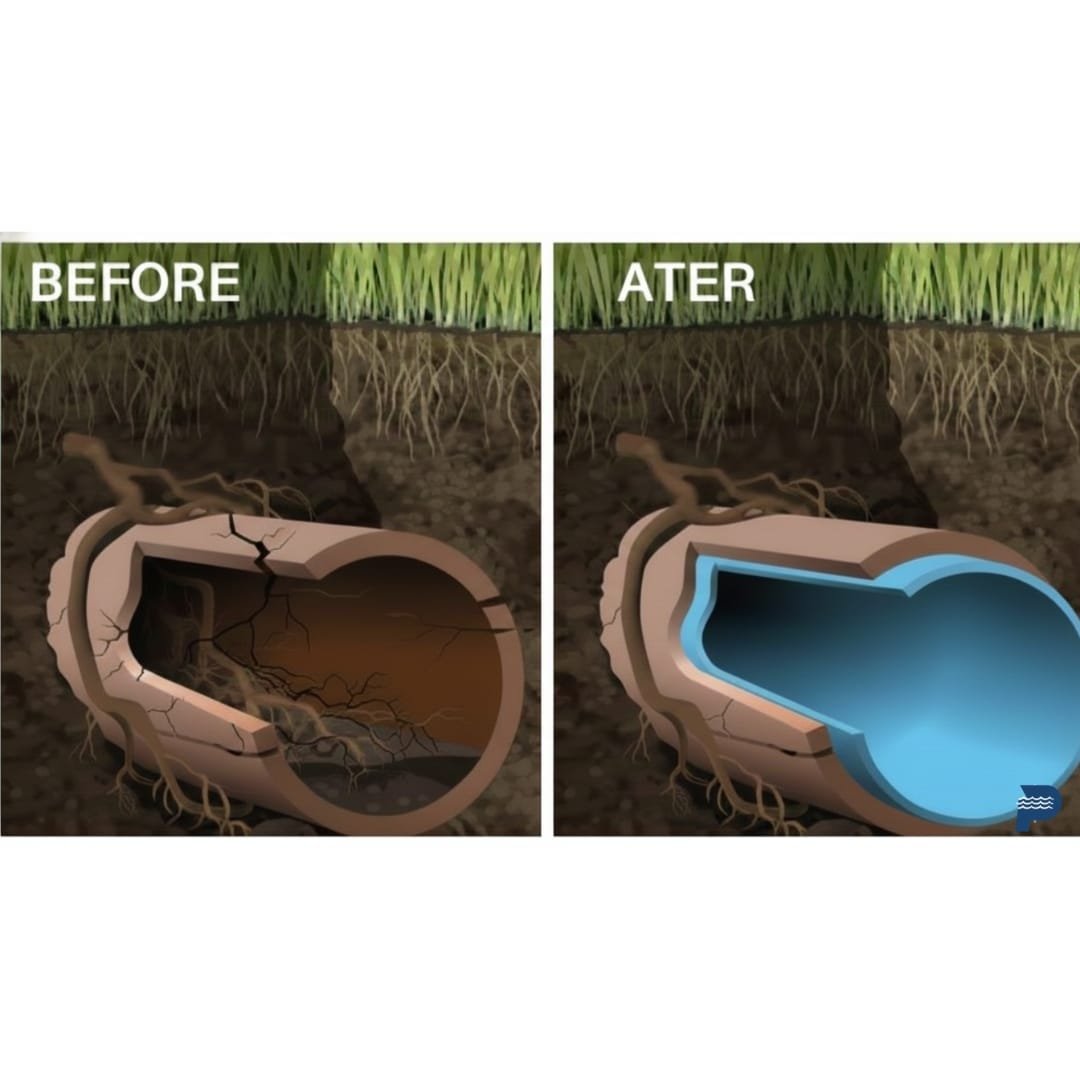
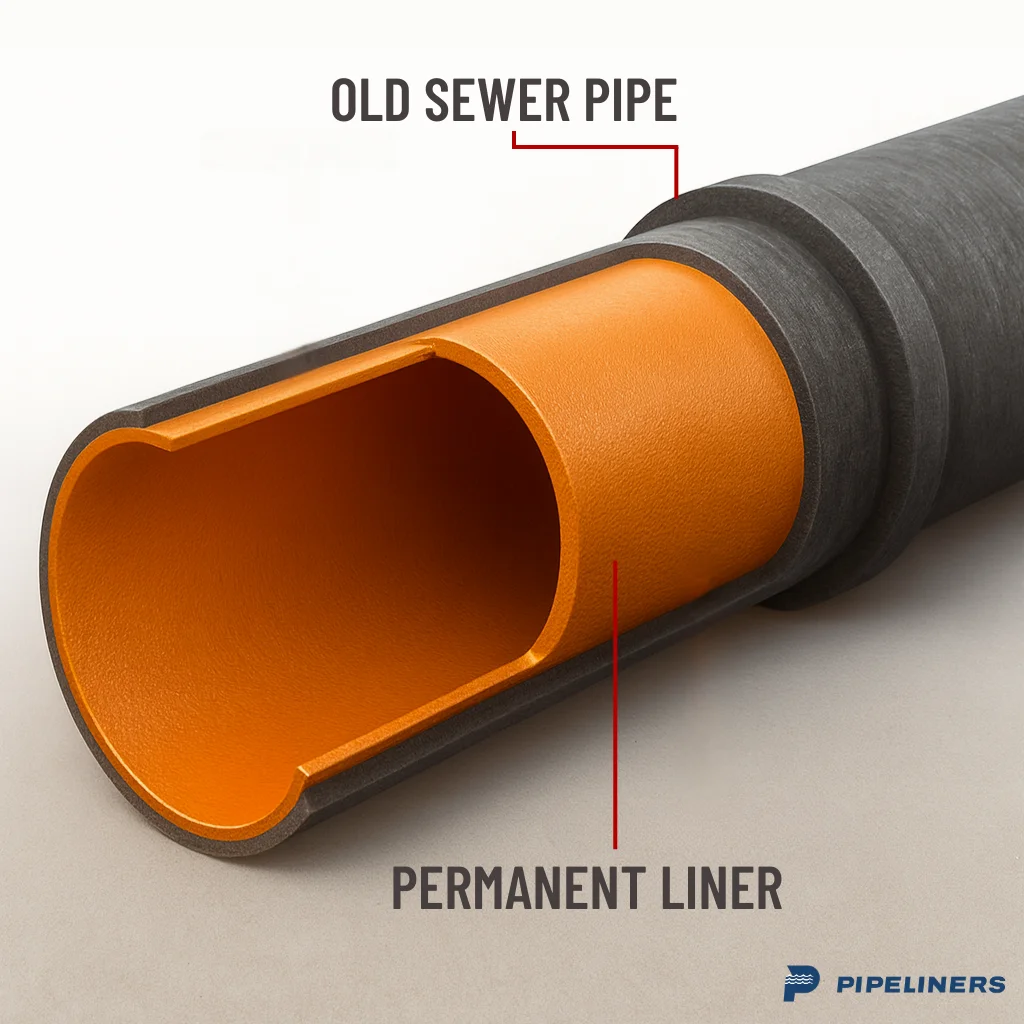
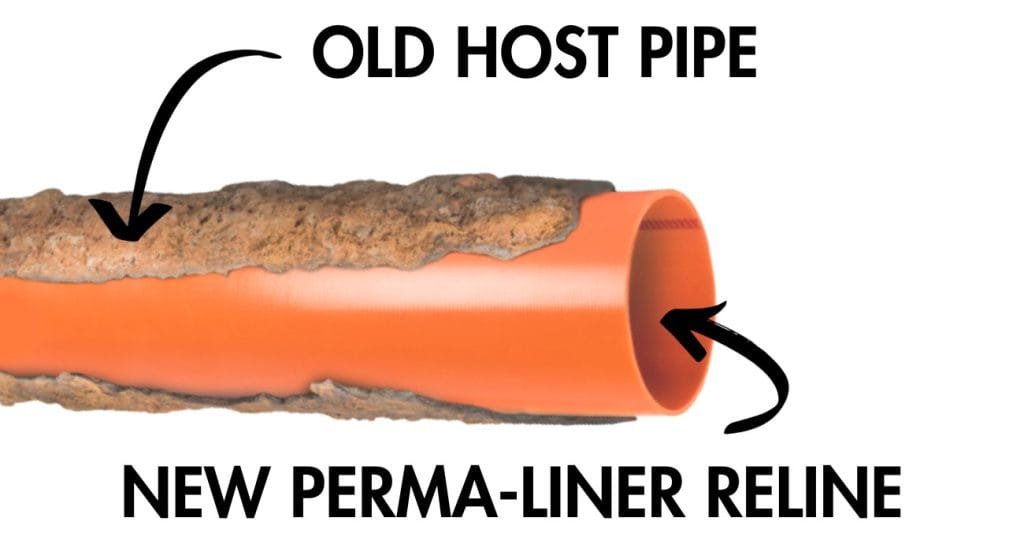
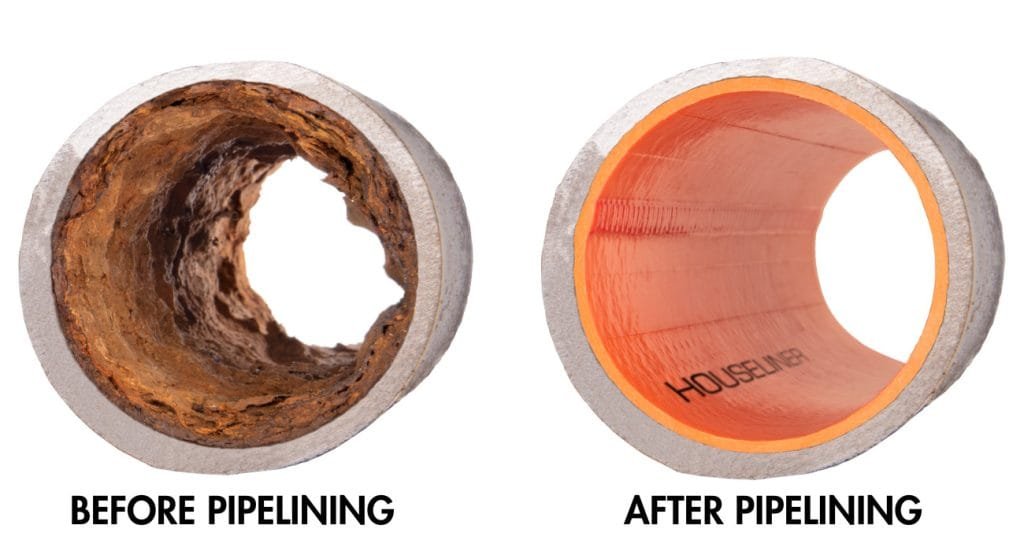
CIPP lining is one of the most widely used trenchless pipelining methods for both sewer drains and certain water pipes. It involves creating a new pipe inside the old one by using a resin-soaked liner that hardens in place. The result is a seamless, jointless pipe-within-a-pipe that seals all cracks and holes in the original line.
How CIPP Lining Works
- Inspection and Cleaning: Technicians first inspect the pipe with a camera and clean it of any debris or roots. The pipe must be free of obstructions to ensure the lining will fit tightly.
- Preparing the Liner: A flexible tube (felt or fiberglass) is saturated with a special resin (epoxy, polyester, or vinyl ester). This “wet-out” liner contains all the ingredients to form a hard pipe once cured.
- Inserting the Liner: The resin-soaked liner is inserted into the damaged pipe either by inversion or pull-in-place. In an inversion lining (commonly used for sewers), the liner is turned inside-out and pushed through the pipe using water or air pressure. This process inverts the liner as it travels, pressing the resin side against the pipe wall. In a pull-in-place install, a winch cable pulls the liner into position from an entry pit to an exit pit (more on pull-in-place in the next section).
- Curing (Hardening): Once the liner is in place covering the length of the pipe, it is inflated against the pipe walls and then cured (hardened). Curing can be done by circulating hot water or steam, or by pulling a UV light source through the line for special UV-reactive liners. The heat or UV causes the resin to polymerize and harden into a solid pipe. With modern techniques, cure times can be very fast – UV curing can solidify a liner in minutes (whereas traditional curing might take several hours).
- Finishing: After curing, the new liner forms a rigid, smooth inner pipe that is tightly fitted to the old pipe. Technicians trim any excess liner at the access points. For sewer lines, if there are branch connections (like other pipes feeding in), those are re-opened by cutting out the liner at those junctions with a robotic cutter. The rehabilitated pipe is now ready for use, typically the same day.
When done, CIPP provides a seamless, joint-free pipe lining that spans any cracks, gaps, or pinholes in the original pipe. It essentially creates a new pipe that is often as strong as a new PVC pipe, all done from the inside. Notably, CIPP liners can negotiate bends and even accommodate moderate changes in pipe diameter. Modern equipment allows lining through 90-degree bends and even restoring lateral connections without digging.
Pros of CIPP Lining
- Minimal Excavation: Little to no digging is required. Often only one access point (like a cleanout or small pit) is needed to insert the liner, avoiding tearing up landscaping, driveways, or floors.
- No Pipe Removal Needed: The old pipe stays in place; the liner cures inside it. This saves the time and cost of physically removing buried pipelines.
- Fast Return to Service: With modern curing, the lined pipe can be ready to use within hours, not days. (UV-cured liners harden almost instantly, and even hot-cured liners are usually done the same day.)
- Extended Lifespan: The new liner is durable and corrosion-resistant, effectively adding 50 years or more of life to the pipe. Many CIPP liners are designed to last as long as a new pipe would (often several decades).
- Indoor/Year-Round Work: Because most work is done via existing openings, technicians can rehabilitate pipes even in winter or indoors without exposing the pipe. This makes it feasible to reline pipes under a building slab or inside walls with minimal disruption.
- Versatile Applications: CIPP can be used on many pipe materials (clay, cast iron, PVC, concrete, etc.) and sizes (commonly 2″ up to 48″+ with different techniques). It works for gravity sewer lines and can also be formulated for pressurized water pipes (using potable-water-safe epoxy resins). In fact, pressure-rated CIPP can rehabilitate water mains or fire suppression lines in addition to drains.
Cons of CIPP Lining
- Not for Collapsed Pipes: CIPP requires the host pipe to have an open pathway. If a pipe segment is severely collapsed or has a large void, you can’t insert or inflate a liner there. Such extreme damage may necessitate spot excavation or pipe bursting instead of lining.
- Diameter Reduction: The lining has some thickness (a few millimeters), which slightly reduces the interior diameter of the pipe. In most cases this doesn’t significantly impact flow (the smooth interior can even improve flow), but in very small pipes or already capacity-limited systems, this is a consideration.
- Size Limitations: Very small pipes (under ~2 inches) are generally too tight to line, and very large pipes may require specialized liners. Standard CIPP is commonly used from about 2″ up to around 48″ diameter; outside this range, other methods might be preferred.
- Upfront Cost and Equipment: The material and equipment costs for CIPP can be higher than a simple dig repair. It requires specialty resins, curing gear (boilers, UV light rigs, etc.), and skilled technicians. However, these higher direct costs are often offset by savings in avoiding excavation and restoration. For extensive or difficult access jobs, CIPP is usually more cost-effective overall when you factor in the avoided disruption.
- Not Ideal for “Belly” Sag Fixes: If a pipe has a significant sag (belly) holding water or is misaligned, a liner will just conform to that defect rather than remove it. Non-uniform slopes or bellies might still cause flow issues after lining. Those situations may need correction by traditional methods or pipe replacement.
Best Use Cases for CIPP
CIPP lining is extremely versatile. It shines in scenarios like:
- Residential Sewer Lines: It’s ideal for renewing old cast iron or clay sewer laterals running from a house to the street. Homeowners avoid having their yard or driveway trenched. Our team at Pipeliners often uses inversion CIPP to rehabilitate home sewer drains with minimal disruption.
- Commercial and Institutional Pipes: CIPP is great for apartments, schools, hospitals, and hotels where you have limited access and want to minimize downtime. For example, we can reline dozens of feet of aging sewer in a school over a weekend, avoiding a lengthy closure. Multi-story building drain stacks can also be lined from the inside.
- Underground Pipes in Developed Areas: Any pipe under a building, busy road, or mature landscaping is a good candidate. Rather than digging up a street or tearing open floors, lining restores the pipe internally. Cities often line aging sewer mains under roads to avoid traffic disruption.
- Corroded Water Pipes (with epoxy): While most CIPP uses are for drains, special epoxy-based liners are used for water pipes. If an old copper or galvanized water line is leaking, a potable water approved CIPP liner can seal it without a full repipe. (For smaller diameter water lines, spray epoxy lining – discussed later – is another option.)
At Pipeliners (serving Mesa/Phoenix, AZ), our trenchless specialists primarily utilize inversion CIPP lining with steam or hot water curing for sewer and drain lines, and we also employ UV-cured CIPP for certain projects. This allows us to tailor the curing method to the project needs – UV for speed on larger diameters, steam/hot water for reliability on typical household lines. The result in all cases is a new, long-lasting pipe inside your old one, completed with minimal disruption.
Pull-in-Place Pipe Lining
Pull-in-Place (PIP) lining is a variation of the CIPP method, distinguished by how the liner is installed. Instead of using air or water pressure to invert the liner, the resin-saturated liner is pulled into position through the pipe. This method requires access points at both ends of the pipe segment being repaired. Once the liner is pulled through, it is inflated and cured just like a standard CIPP liner, forming a new pipe within the old.
How Pull-in-Place Lining Works
- Two Access Points: PIP lining needs an entry and exit point. This could be two manholes, a cleanout and another cleanout, or small excavation pits at each end of the pipe section. A rope or cable is fed through the pipe from one end to the other.
- Resin Wet-Out: A felt or fiberglass liner is saturated with resin (the same types of resin used in CIPP). The liner in PIP is often reinforced so it can handle being pulled.
- Pulling the Liner: The resin-soaked liner is attached to the cable and carefully pulled into place along the inside of the pipet3liningsupply.com. This is usually done with a winch. The liner is positioned so it covers the damaged section of pipe (it can line the full length between the two access points).
- Inflation and Curing: Once in position, the liner is inflated using air or water pressure to press it tightly against the pipe interior. It’s then cured (often with hot water/steam circulated through the liner). After curing, the bladder is removed, leaving the hardened liner in place. The result is essentially a CIPP repair. Any service connections covered by the liner are reopened as needed.
In essence, pull-in-place achieves the same structural pipe lining as inversion CIPP – the difference is just the installation method. PIP is commonly used for spot repairs (short sections) or when only two smaller pits can be made instead of one large access pit for inversion.
Pros of Pull-in-Place Lining
- Trenchless (Minimal Digging): Like other pipelining methods, extensive excavation is avoided. Some digging may be needed to create the two access points if existing openings aren’t available, but it’s still far less invasive than open trench repair.
- Fast Cure and Turnaround: The curing process is the same as CIPP, so within a few hours the pipe can be rehabilitated and back in service. It’s much quicker than a traditional dig repair that could take days.
- No Old Pipe Removal: The old pipe stays in the ground; no need to haul out old pipe materials. The liner effectively re-lines the interior.
- Lower Equipment Cost: For contractors, PIP lining can be done with simpler setups compared to inversion. It often uses a winch and standard CIPP curing equipment, potentially making the initial investment in equipment lower. This can translate to cost savings for suitable jobs.
Cons of Pull-in-Place Lining
- Requires Two Access Points: Unlike inversion (which can sometimes be done through one access like a single cleanout), PIP needs entry from both ends of the pipe. If your pipe segment doesn’t already have two access points, it might require two small excavations instead of one.
- Limited Distance: PIP is generally better for shorter runs of pipe. Pulling a liner over a long distance can create a lot of friction. Beyond a certain length (depends on diameter and bends, but often under ~100 feet), the pull may become too difficult. Inversion is usually favored for longer continuous lines.
- Friction Challenges: Dragging the liner in can be tricky, especially if the pipe has bends or rough interior. There’s a risk that the liner can snag or stretch if the pull is hard. This is why PIP is often used for sectional relining or relatively straight shots.
- Diameter Constraints: Extremely small-diameter pipes or very large pipes are less commonly done with pull-in-place. Small pipes may not allow the liner and pull cable to go through easily, and very large pipes might be too heavy to manually winch in a liner (those are often done by inversion or other methods).
- Same Limits as CIPP: PIP is essentially a form of CIPP, so it shares the general limitations of any CIPP liner – it can’t span completely missing sections, it reduces diameter slightly, etc. If a pipe is collapsed, pull-in-place won’t work there either without first addressing that collapse.
Best Use Cases for Pull-in-Place
- Sectional Repairs: If one section of a pipe (say 20 or 30 feet) is bad, PIP is a great way to reline just that section without relining the entire pipe. For example, if a sewer lateral has a known bad stretch under a slab, you could dig two small holes at its ends and pull in a liner just through that stretch. This is more efficient than lining the whole pipe.
- Pipes with Two Accesses: Municipal sewer lines that run from one manhole to the next can be good candidates – you already have an opening at each end (manholes), so a liner can be pulled between them. Similarly, an indoor pipe with access from two ends (like two cutout sections of a pipe) could be rehabilitated by PIP.
- Situations to Avoid Inversion: Inversion requires space for an inversion drum and sometimes a vertical inversion stand or column of water. If the site is too tight to set up that equipment, or the pipe route has too many bends for inversion pressure to work, PIP might be chosen.
- Lower Budget/Equipment Scenarios: Smaller plumbing contractors sometimes start with pull-in-place methods because the gear investment is a bit lower. For small-scale operations or specific projects, PIP can be a cost-effective option that still delivers a fully structural liner.
In summary, pull-in-place lining is another tool in the trenchless toolkit that achieves the same end result as CIPP inversion – a new pipe inside the old – but by pulling rather than pushing the liner. It’s particularly useful for short pipe segments and selective repairs. Homeowners likely won’t notice a difference in the finished product; whether the liner was inverted or pulled in, the pipe will be fixed internally and ready to use within hours.
Pipe Bursting (Trenchless Pipe Replacement)
Pipe bursting is a trenchless method used not to line an old pipe, but to replace it entirely with a new pipe. It’s fundamentally different from CIPP or slip lining because the old pipe is broken apart and a new pipe is pulled through the path. Pipe bursting is typically employed when a pipe is too damaged to be salvaged or when increasing the pipe size. Rather than digging up the old line, bursting destroys it underground and immediately lays a new pipe in the same tunnel.
How Pipe Bursting Works
- Access Pits: Pipe bursting requires excavation at two points: a launch pit and a receiver pit. These are usually at the ends of the pipe segment being replaced (for example, one pit near the building, one near the street for a sewer line).
- Insert Cable/Rod: A heavy-duty steel cable or threaded rod is fed through the old pipe from one end to the other. This will be used to pull the bursting tool and new pipe.
- Attach Bursting Head and New Pipe: At the launch end, a bursting head (a cone-shaped or bullet-shaped metal tool) is attached to the cable. Behind the bursting head, the new replacement pipe is attached. The new pipe is often high-density polyethylene (HDPE) or PVC, and it’s usually the same diameter as the old pipe (or sometimes one size larger if upsizing). The bursting head is slightly wider than the new pipe.
- Bursting Process: Using a hydraulic winch or bursting machine, the cable pulls the bursting head through the old pipe. The head breaks the old pipe apart – splitting or fracturing it into pieces – and pushes those fragments outward into the surrounding soil. The soil briefly expands to accommodate the bursting head. Immediately behind the head, the new pipe is dragged into place. Essentially, the old pipe’s path is enlarged just enough to fit the new pipe, which occupies the space as the old pieces are displaced.
- Completion: Once the bursting head emerges at the receiver pit, the new pipe is fully in place. The new pipe is then connected to the existing plumbing at both ends (for a sewer, one end to the house lateral, the other to the city main or stub). The access pits are backfilled, and any surface restorations (patching a small hole in pavement or yard) are done.
The result is a brand-new continuous pipe where the old one used to be, achieved without digging a continuous trench. The old broken pipe pieces are simply left in the ground around the new pipe.
Pipe bursting works on many pipe materials – cast iron, clay, concrete, even brittle PVC – as long as the soil can absorb the fragments. It’s widely used for sewer lines and water lines alike (for water pipes, the process is similar, just ensuring the new pipe is appropriate for drinking water and making proper connections).
Pros of Pipe Bursting
- Complete Pipe Replacement: Bursting gives you an entirely new pipe rather than a repaired old pipe. This is a big advantage if the old pipe is heavily deteriorated or near collapse. The new pipe (often HDPE) is leak-free and durable, usually with a lifespan of 50+ years. Essentially, it’s like installing a brand new line without open trenching.
- Handles Severe Damage or Collapse: Since bursting doesn’t rely on the old pipe’s integrity, it’s ideal for severely damaged or collapsed pipes where a liner or coating couldn’t get through. Even if the old pipe is missing sections or fully blocked, as long as you can get the cable through (sometimes by tunneling or pushing it through the soil in worst cases), you can replace the pipe.
- Minimal Surface Disruption: Like other trenchless methods, it avoids continuous excavation. Only the entry and exit pits are dug, which are much less disruptive than digging the whole pipe length. This is great for urban areas, yards, or under buildings – reducing cost and mess significantly compared to open-cut replacement.
- Possible Upsizing: Pipe bursting allows you to increase the pipe diameter if needed. The bursting head can be sized to expand the hole larger than the old pipe, allowing a bigger new pipe. For instance, replacing a 4-inch sewer with a 6-inch one is feasible. This is useful if the existing pipe was undersized for the flow. (By contrast, lining methods slightly decrease diameter.)
- Install Multiple Pipes: In some cases, you can even pull multiple new lines into the space of one old pipe during a single burst. For example, an old large conduit could be burst and two smaller new pipes pulled in side-by-side. This is a more specialized scenario (mentioned as a benefit in some industry sources), but it showcases the flexibility of the method.
- Long New Pipe Lengths: You can often replace long runs in one go. If you can dig pits at manholes or access points up to hundreds of feet apart, you can pull in a continuous new pipe that length. This reduces joint count (and joints are often where leaks happen).
Cons of Pipe Bursting
- Requires Some Excavation: While far less invasive than open-trenching, you still have to dig at least two pits. If the pipe is very long, you might need intermediate pits to assist or to reconnect lateral lines. Thus, it’s not “no-dig” – it’s “minimal dig.” In tight spaces where even small pits are problematic (say, inside a building), bursting might be challenging.
- Old Pipe Is Destroyed: Pipe bursting does not preserve the old pipe (by design it shatters it). This isn’t usually a concern (since the goal is replacement), but it means you cannot undo the process – it’s a one-way street. If something goes wrong mid-burst (very rare, but if the head gets stuck), you may have a mess with a half-burst pipe to address. Proper planning and experienced operators prevent this in practice.
- Higher Cost for Small Jobs: The equipment and effort for bursting can make it a bit less cost-effective for short or small-diameter replacements. For example, if only a 10-foot section is bad and accessible, a spot repair or short liner is cheaper than mobilizing a bursting setup. Pipe bursting shines on longer runs or whole-line replacements, but is overkill for a tiny fix.
- Risk to Nearby Utilities: When the old pipe shatters, the outward pressure can disturb the ground. If other utilities (like gas lines, water lines, etc.) are immediately adjacent to the pipe being burst, there’s a slight risk of damaging them. In practice, careful planning and locator checks mitigate this. Bursting is generally safe if the surrounding area is known and clear, but it requires due diligence.
- Not for Every Pipe Material or Soil: Extremely hard pipe materials or weird obstructions can be a challenge. Also, if the surrounding soil is very loose or if the pipe is encased in concrete, bursting might not work without special techniques. Generally, standard pipes (clay, cast iron, concrete, asbestos cement, etc.) in typical soils are fine for bursting, but a thorough assessment is needed.
Best Use Cases for Pipe Bursting
- Collapsed or Failed Sewers: If a sewer line has collapsed sections, massive root intrusion, or has already been patch-repaired multiple times, bursting is often the best long-term fix. It gives a brand new pipe, solving the problem once and for all. We often recommend bursting for Orangeburg sewer lines in older homes, since that material often deforms and collapses – lining an Orangeburg pipe might not be wise if it’s misshapen, but bursting cleanly replaces it.
- Replacing Undersized Pipes: When increasing capacity is needed (say a commercial facility upgrading a sewer line for higher usage, or upsizing a water main), pipe bursting can upsize without trenching the whole route. Cities use this to avoid tearing up streets when enlarging aging water or sewer mains by one pipe size.
- Long Municipal Lines: Municipalities use bursting for long stretches of sewer or water lines between access points. If there’s a straight run between manholes, they can replace that entire run with new pipe quickly. The same goes for water distribution lines under city streets – a few pits per block can replace a whole pipeline.
- Yard or Under-Slab Water Line Replacement: For water service lines (like the pipe from the meter to your house), bursting is a popular trenchless replacement option. If a galvanized or polybutylene water service is leaking, a small pit at each end allows pulling in a new HDPE water line. This avoids digging up your yard or cutting into driveway slabs. It’s commonly used in Phoenix area for replacing old polybutylene water lines that frequently leak.
- Environmentally Sensitive Areas: If a pipe runs through a garden, a tree root zone, or a delicate landscape, bursting saves those features. Only small pits at the ends mean a tree or established cactus in the middle of the run can remain untouched, whereas digging would require removal. In the desert landscapes of Arizona, avoiding disruption to gravel layouts and hardscape is a nice perk.
In summary, pipe bursting is the go-to trenchless method when you need a completely new pipe or when a pipe is beyond the point of lining. It’s slightly more invasive than internal lining (due to the pits), but far less so than full excavation. It effectively trades a trench for a couple of pits, and you get a modern new pipe as the outcome. The method has proven very successful for sewer and water line replacements, boasting long-term reliability and big savings on surface restoration costs.
Slip Lining
Slip lining is a traditional trenchless rehabilitation technique that’s been around for decades (long before CIPP became common). In slip lining, a new pipe of smaller diameter is physically inserted into the existing pipe, and the space between them is filled (grouted) to secure it. In essence, the old pipe becomes a host sleeve for a new carrier pipe. This method is simple and effective for certain situations, especially larger-diameter pipelines or straight runs.
How Slip Lining Works
- Access and Cleaning: Slip lining typically requires creating an access pit or using an existing manhole. The old pipe is cleaned out and any obstructions removed, since the new pipe needs a clear path through.
- Inserting New Pipe: Sections of a new pipe (often made of HDPE, PVC, or fiberglass) are pushed or pulled into the old pipe. If using HDPE, it is often fused into a continuous length and then pulled into the host pipe from the pit. PVC or FRP segments might be pushed from one section to another. Essentially, you’re feeding a slightly smaller diameter pipe inside the larger one. For example, a 6-inch OD new pipe might slip inside an 8-inch old pipe.
- Grouting the Annulus: Once the new pipe is in place, the annular space (gap) between the outside of the new pipe and the inside of the old pipe is filled with grout. The grout is usually a cementitious or resin grout that hardens, which locks the new pipe in place and prevents water from flowing in the gap. Grouting also transfers loads – ensuring the old pipe and surrounding soil support the new pipe and vice versa.
- Sealing and Connecting: The ends of the new liner pipe are sealed to the host pipe or to new fittings so that flow only goes through the new pipe. If it’s a sewer, they might reconnect it at a manhole or use special end seals. If the slip line was in a pressure main, they’ll connect the new pipe into the system at both ends with appropriate couplings. After that, the pipeline is back in service carrying flow through the new inner pipe.
Because slip lining involves putting a solid pipe inside another, it reduces the interior diameter of the flow path. This is its main trade-off. The method has been widely used in large municipal sewer mains, storm drains, and culverts where losing an inch or two of diameter is acceptable for the benefit of avoiding excavation.
Pros of Slip Lining
- Proven and Simple: Slip lining is one of the oldest trenchless methods, so it’s well-understood and reliable. It’s a straightforward concept: just slide in a new pipe. Fewer complex steps (no chemical curing, etc.) means a lower chance of unforeseen issues.
- Fully Structural New Pipe: The result of slip lining is essentially a brand new pipe inside the old one, much like pipe bursting yields a new pipe. The new liner pipe typically can handle full structural loads on its own (especially if it’s HDPE or PVC). So even if the old host pipe completely deteriorates over time, the new pipe will still carry the load.
- Minimal Downtime: The process can be done relatively quickly. In many cases, once the pit is excavated and the new pipe fused, pulling it in and grouting might be done in a day or two. Because there’s no long curing time (just waiting for grout to set, which is not very long), the total project time is often short. For large pipes, this is a huge time saver versus a massive dig job.
- Cost-Effective (Material and Installation): Slip lining materials (like HDPE pipe) are generally affordable, and the method doesn’t require highly specialized equipment. This often makes it less expensive for customers and contractors compared to more high-tech methods. Especially for large diameter pipelines, CIPP liners and epoxy can get very pricey, whereas standard HDPE pipe might be cheaper by comparison.
- Handles Large Gaps or Breaks: Since you’re inserting a self-contained pipe, it can bridge over sections where the old pipe may have large gaps or breaks. As long as the new pipe can physically fit through, it doesn’t matter if the old pipe had big cracks or missing chunks – the new pipe spans those voids easily. This is useful in old brick or clay sewers that might have sections of wall missing; slip in a continuous pipe and you’re good to go.
- Applicable to Big Diameters: Slip lining is often the go-to for very large diameter sewers and culverts (think 36 inches, 48 inches, or several feet in diameter). It’s simpler to execute in big pipes than some other methods. For instance, spiral wound lining or segmental slip lining is used in huge tunnels. CIPP for really large sizes can be complex, so slip lining remains a common choice for big infrastructure.
Cons of Slip Lining
- Significant Diameter Reduction: The new pipe must be smaller than the old pipe to fit inside, so you lose some flow capacity. This is the biggest downside. If a pipe was already at capacity, slip lining could make it under-capacity unless you compensate somehow (sometimes the smoother new pipe offsets a bit, but a smaller cross-section is still a limitation). For gravity sewers, this could mean slightly higher flow velocity but less volume capacity. Engineers have to evaluate if the reduced diameter still meets the needs; if not, another method or upsizing via pipe bursting might be better.
- Limited Use in Small Pipes: You generally cannot slip line very small pipes (under maybe 4 inches). If you tried to put a pipe inside a 3″ line, you’d end up with something too tiny to be practical. Slip lining is mainly used in medium to large pipes (commonly 6″ and up, with 8″ or larger being more common). For a 4″ sewer, the next size down might be 3″ inner pipe, which is a big drop in cross-sectional area (~44% reduction in area). So, slip lining is rarely done in household laterals; it’s more for mains.
- Annular Space and Grout Issues: If not grouted properly, the space between pipes can become a path for leaks or cause the liner to move. Grouting adds a step and cost, and improper grouting can lead to issues like the liner pipe deforming or groundwater getting between liner and host. Also, grout curing generates heat and expansion – it must be done carefully to avoid collapsing the liner (rare but a consideration for thin-wall liners).
- Not Suitable for Complex Geometries: Slip lining works best in straight runs. If the pipe has sharp bends or lots of connections, it’s tricky. You often can’t slip line through a 90° bend with a rigid pipe. Also, any laterals or junctions on the line have to be reconnected, often requiring excavation at those points or specialized fittings. So slip lining a line with many service connections can be labor-intensive, as each connection might need to be excavated or reinstated.
- Long Joints or Segment Issues: If using segmented pipe (like sticking shorter PVC pieces through), every joint is a potential weakness or point of snag during insertion. Fused HDPE continuous pipe avoids this, but not every situation allows a long continuous insertion. If there’s not a straight shot or space to lay out the pipe for pulling, you might have to insert in segments. Each segment then has to be securely joined inside the pipe, which can be complex.
- Older Method (Losing Popularity): While still effective, slip lining has “lost ground to newer, more efficient methods like CIPP”. This is partly because of the aforementioned downsides. Many contractors now prefer CIPP for moderate pipe sizes because it doesn’t reduce diameter as much and can navigate bends. Slip lining remains invaluable for certain large or straight-shot projects, but is used less for small diameters or where CIPP can do the job.
Best Use Cases for Slip Lining
- Large-Diameter Sewer Mains: Municipal sewer or storm drain lines that are, say, 24 inches, 36 inches, or larger and have plenty of capacity to spare are good candidates. Slip lining a 36″ with a 30″ pipe, for example, still leaves a large conduit. Cities might do this for aging brick or concrete sewers under roads to avoid street excavation.
- Culverts Under Roads/Railways: A culvert (large drain pipe under a road or railroad) that is rusted or cracked can be slip lined with a slightly smaller pipe to reinforce it. This avoids digging up the roadway or disrupting train tracks. The slight loss in diameter is often acceptable in drainage scenarios.
- Straight Runs with Few Connections: If you have a long straight pipe run with no lateral service taps in between (or you can abandon the old laterals), slip lining is relatively easy. For instance, an industrial facility’s process water line running 500 feet straight under a property could be slip lined if it’s leaking.
- Combining with Pipe Bursting: In some cases, a strategy might involve bursting a part of a pipeline and slip lining another. For example, upsizing isn’t needed but the pipe is large – you might slip line most of it, and if one section is too tight, you could locally burst a short portion to insert a larger liner. This is more of an engineering scenario, but it’s about using slip lining where feasible and other methods where not.
- Limited Budget, Big Pipe: When budget is a concern, slip lining can be a cheaper way to rehab a big pipe. The materials (standard HDPE or PVC pipe) are off-the-shelf and often less expensive than custom-fabricated liners or tons of epoxy. If the capacity hit is manageable, slip lining can deliver a fix that’s “good enough” at a lower cost, which appeals to many municipal budgets.
Overall, slip lining remains a practical trenchless method, particularly for large pipes where newer methods may be cost-prohibitive or unnecessary. It trades a bit of capacity for a lot of simplicity and cost savings. The Phoenix area doesn’t see slip lining as often in small residential lines, but our team might consider it for larger commercial or municipal projects where appropriate.
Spray-Applied Epoxy Lining (Spray-In-Place Pipe)
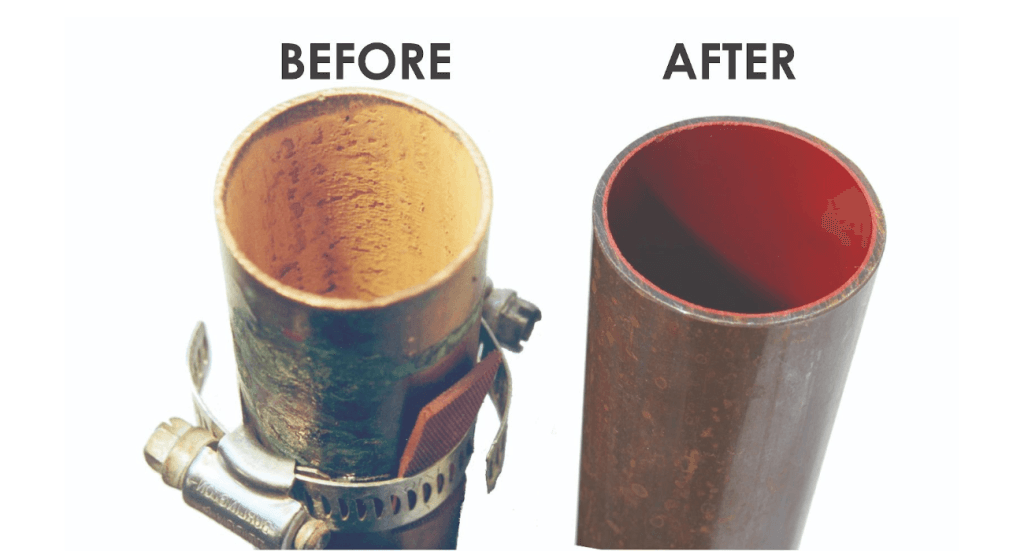
Spray-applied epoxy lining, also known as spray-in-place pipe (SIPP) coating, is a trenchless technique where instead of inserting a sleeve, we coat the inside of the pipe with a liquid resin that cures in place. Essentially, it’s like painting a pipe from the inside with an epoxy that forms a thin new pipe lining. This method is frequently used for potable water lines and smaller-diameter pipes where CIPP liners might be difficult to install. Our company offers an epoxy lining service for water pipes (often referred to by the brand ePIPE for potable water) which uses this very approach.
How Spray-In-Place Epoxy Lining Works
- Pipe Preparation: The pipe interior must be cleaned and prepped thoroughly. For water lines, this means shutting off water and then drying the pipe (often with heated air) and abrasively cleaning it – typically sand blasting or using an abrasive air flush – to remove any scale, rust, or debris. A clean, dry surface is crucial for epoxy adhesion.
- Spraying the Epoxy: A specialized machine is used to apply a coating of liquid epoxy onto the pipe walls. One common technique uses a spinning spray head that is inserted into the pipe and pulled through at a controlled speed, spraying epoxy in a 360° fan as it moves along. Another approach for smaller lines is to blow epoxy through with air pressure (lining the pipe as the epoxy coats and moves). The epoxy is typically two-part and mixes at the nozzle before hitting the pipe wall. It goes on as a thin layer (often just a few millimeters or less).
- Curing: After application, the epoxy is allowed to cure and harden. Depending on the product, curing might be at ambient temperature or accelerated by blowing hot air or steam through the line. Some epoxy linings cure very quickly – for example, certain potable water epoxies can cure in as little as 2 hours for a return to service. During curing, the epoxy solidifies into a tough, impermeable coating bonded to the inside of the pipe.
- Multiple Coats (if needed): In some cases, technicians might apply more than one coat if a thicker lining is required. However, multiple coats must be done carefully to ensure bonding between layers. Many systems aim to achieve the desired thickness in one pass to avoid this.
- Reassembly and Testing: If we’re lining, say, an in-place water piping system, we might have had to cut small access points or remove fittings to insert the spray equipment. After curing, we reconnect any removed sections (for example, reconnecting a removed valve or section of pipe). The line is then flushed and pressure-tested. For potable water, it’s also important to flush out any residual solvents and ensure the line is clean and safe after cure.
The end result is a smooth epoxy lining covering the entire interior surface of the pipe. This seals pinhole leaks, bridges small gaps, and provides a barrier against further corrosion or leaching of metals (like lead or copper) into the water. In drain pipes, epoxy coating can seal minor cracks and prevent infiltration/exfiltration.
Pros of Spray-Applied Epoxy Lining
- Minimal Invasion & Quick Work: Like other trenchless methods, epoxy lining is done internally, so hardly any demolition or digging is needed (just access points to insert the sprayer). The service time is short – often the pipe can be back in use the same day, within hours of the coating. This is great for both homeowners and commercial buildings that can’t have their water off for long.
- No Major Diameter Loss: Epoxy coating is very thin, so it only marginally reduces the pipe’s internal diameter. It’s usually just a millimeter or two of thickness, which typically has negligible impact on flow. In fact, the smoothness of the epoxy can improve flow in old rough pipes. This makes epoxy attractive for smaller water lines (like 1/2″ or 3/4″ copper plumbing) where you cannot afford to lose much cross-section.
- Extends Pipe Life 50–100 Years: A properly applied epoxy liner effectively stops corrosion and leaks, potentially adding many decades of life to the pipe. Sources cite that epoxy lining can extend a pipe’s life by 50 years or more, with some claiming up to a century in ideal conditions. The epoxy forms a corrosion-resistant barrier, so the old pipe’s material is no longer in contact with water or sewage, halting further decay.
- Safe for Drinking Water: The epoxies used for water pipe lining, such as the ePIPE® system, are NSF/ANSI 61 certified for potable water. That means they have been tested and approved not to leach harmful substances into drinking water. When properly applied under the right conditions, epoxy lining is a safe solution for domestic water pipes. (It’s worth noting that reputable contractors will use only certified products for drinking water lines.)
- Ideal for Small or Intricate Piping: Epoxy spray can reach places a CIPP liner can’t. For example, inside a house with 1/2″ or 3/4″ diameter copper pipes running through walls – you can’t easily put a felt liner in those, but you can often coat them. It’s also useful for complex configurations (multiple bends, tees, etc.) as the spray can coat around corners and through fittings to some extent.
- Little to No Excavation for Water Lines: For in-building water systems, epoxy lining is done by accessing the pipes at existing openings (like a removed faucet or cut section). You typically don’t have to tear open walls beyond a few small holes, if any. This is a huge plus for condominiums or office buildings where repiping would mean lots of wall cuts; epoxy can be done via fixtures and small access points.
Cons of Spray-Applied Epoxy Lining
- Not Structural: A spray-on epoxy lining is generally considered a non-structural repair. It’s a thin coating, not a new pipe wall. If the existing pipe is structurally compromised (deep cracks, holes, or is crumbling), epoxy won’t restore its strength. It’s best for sealing pinholes, corrosion, and minor leaks – but if you have a big hole or a section of pipe missing, epoxy can’t bridge a large gap on its own. CIPP or pipe replacement would be needed for major structural defects.
- Limited Pipe Diameter & Use Cases: Spray lining is mostly used for relatively small diameters (e.g. water lines up to maybe 4 inches, or drains up to 6-8 inches). Large diameter pipes are less serviceable with spray lining because applying a uniform coat over a big circumference is challenging, and multiple passes would be needed. Also, the volume of epoxy required and cure control becomes harder in big pipes. For large sewers, other methods like CIPP or spin-cast cement (for sewers) are preferred.
- Surface Prep is Critical: Epoxy relies on bonding to the old pipe. If the pipe isn’t cleaned properly or is oily, the epoxy can delaminate (peel off) over time. Epoxy also shrinks slightly as it cures, which can cause it to pull away if not well-bonded. Delamination is a serious concern – a poorly bonded liner could potentially flake and even cause blockages. This means the contractor must be meticulous. Not all pipes are good candidates (e.g., very greasy cast iron sewer lines might not coat well without intensive prep).
- Permanent but Not Repairable: The phrase “repairs are permanent, so any additional leaks or damage may require replacement” reflects that once you coat a pipe, you can’t easily re-coat or spot-fix it if something goes wrong later. If a new hole forms or the epoxy comes off in one area, you might have to consider a more invasive fix at that point (since you can’t just layer more epoxy on an already cured lining without proper bonding). Essentially, you’ve committed to that method. In contrast, if a CIPP liner somehow failed later (rare), you could line again or try another method. With epoxy, re-coating a small section is tricky.
- Environmental and Health Precautions: While cured epoxy is inert and safe, the installation involves chemicals (resins, solvents) with strong odors and potential VOCs. Proper ventilation is needed, and occupants might need to vacate during the process in a building (especially if doing many in-wall pipes). There’s also the possibility of a lingering epoxy smell for a short time after curing. Reputable providers use venting and flushing to minimize this. Additionally, one must ensure the epoxy mix is correct and fully cured before drinking water passes through, to avoid any contamination. Checking certifications and installer practices is advised.
- Flow Restriction if Over-Applied: If too thick a coating is applied in a small pipe, it may constrict water flow and cause issues. Precision is needed to apply just enough epoxy to coat without significantly narrowing the pipe. An inexperienced application could accidentally create a partial blockage (for instance, if epoxy puddles at a low point). This is again why proper technique and even machine-calculated application is important.
Best Use Cases for Spray Epoxy Lining
- Potable Water Pipe Rehabilitation: One of the most common uses is for aging domestic water piping in buildings – especially when pipes are experiencing pinhole leaks or corrosion but are largely intact. Rather than tearing out and replacing all the plumbing in, say, a 30-unit apartment building (which is costly and disruptive), epoxy lining can coat the inside of the existing copper or galvanized pipes, sealing leaks and stopping further corrosion. The building’s water system gets a new lease on life with minimal wall cuts. In Phoenix, where many mid-century homes have corroded galvanized pipes, epoxy lining (like ePIPE) offers a way to avoid a full repipe.
- Fire Sprinkler and HVAC Lines: Epoxy is also used in commercial properties to rehabilitate fire sprinkler piping or chilled water lines. These are often extensive piping networks where leaks can be very troublesome. Coating them extends life and prevents leaks without having to replace pipes running through finished ceilings or sensitive areas.
- Small Diameter Drain Lines: In some cases, 1.5″ or 2″ drain lines (such as those from sinks or showers) can be epoxy coated if they are too small or have too many bends for CIPP. This can seal pinholes or joint leaks in older cast iron traps or lines where a traditional liner can’t be easily inserted.
- When Excavation or Replacement Is Impractical: Any scenario where the pipe is encased in concrete or buried in a spot that’s nearly impossible to excavate, and the pipe is leaking due to corrosion, epoxy might be the only viable fix. For example, a pipe embedded in a thick foundation or passing through a historical building – replacing it would be a nightmare, but coating it could solve the issue.
- Preventive Corrosion Protection: Sometimes epoxy coating is applied not because a pipe is leaking now, but to proactively prevent future corrosion. For instance, lining a section of iron pipe that is known to have corrosive water, as a preventative measure. Some municipalities have used cement or epoxy linings in old water mains to prevent tuberculation and lead leaching, extending their useful life until a full replacement can be done years later.
In summary, spray-applied epoxy lining (SIPP) is a valuable method especially for water pipes and smaller lines. It’s essentially giving the pipe a new inner skin. Our team uses the ePIPE epoxy lining for potable water systems, which can seal leaks and even help address lead/copper contamination by sealing the pipe interior. When done correctly for the right pipes, epoxy lining is safe, fast, and extends the life of your plumbing with barely any disruption. However, it’s not a cure-all – badly deteriorated pipes or large structural issues will still call for other solutions like CIPP or replacement.
Mechanical Point Repair (Spot Repair)
Not every pipe issue requires lining an entire run or replacing the whole pipe. Sometimes, you have one bad spot – like a small section of pipe that’s cracked or a joint that’s leaking – and the rest of the pipe is fine. In these cases, a mechanical point repair (also called spot repair or pipe patch) is a smart trenchless fix. Mechanical point repair involves installing a short sleeve or patch at the problem spot internally, without digging up that section of pipe. Think of it like a stent that props open and seals a damaged artery, but for your pipeline.
How Mechanical Point Repair Works
- Identify the Problem Area: Using a sewer camera, technicians pinpoint the exact location and length of the defect (for example, a 6-inch long crack at 45 feet from the access point). They measure the pipe diameter as well.
- Select Repair Sleeve/Patch: A mechanical point repair system typically uses a stainless steel sleeve that has an expandable mechanism, with a rubber gasket on the outside. One popular product, for instance, is QuickLock™, which is a steel sleeve with a rubber sealing ring. There are also CIPP spot patches that use a small resin-coated fiberglass piece on an inflatable packer – those are similar concept but involve resin. Here, we’ll focus on the purely mechanical type (no resin).
- Positioning: The sleeve is collapsed or sized to fit inside a launching device (often an inflatable packer) which is attached to a push rod or cable. The assembly is inserted into the pipe and navigated to the damaged spot (using measurements and sometimes a live camera or a calibrated distance marker). For long distances, a robotic crawler might carry it into place.
- Expansion and Locking: Once the sleeve is centered over the defect, the inflatable packer is activated. It expands, pressing the sleeve against the pipe wall. The steel sleeve is designed to lock in the expanded position (often with teeth or a locking mechanism). As it expands, the rubber gasket on the outside of the sleeve is compressed tightly against the pipe interior, forming a seal over the crack or joint. Essentially, it plugs the leak and reinforces that spot.
- Removal of Packer: The packer is then deflated and pulled out, leaving the steel sleeve in place. The sleeve remains as a permanent internal band-aid. It’s thin enough that it doesn’t significantly obstruct flow. If multiple adjacent sections need repair, additional sleeves can be overlapped or placed with some gap as needed (some systems allow linking sleeves to cover a longer span).
The mechanical sleeve covers the hole or crack, prevents water from entering or exiting (for sewer, preventing groundwater infiltration or sewage exfiltration; for storm drains, preventing soil erosion; for water lines, stopping leaks). It also restores some structural integrity at that spot by essentially creating a sturdy bridge across the damaged area.
Pros of Mechanical Spot Repair
- Truly No-Dig for Small Fixes: Point repairs can be done entirely through existing access points (like a cleanout or manhole). There’s no excavation needed at the repair spot, which is a huge advantage if the bad spot is under a building or a busy road. You only need access to one end of the pipe to insert the packer.
- Quick Installation: Installing a point repair sleeve is usually a matter of hours, often less. Once in position, the expansion and locking happen in minutes. There’s no curing time to wait for (in the case of mechanical sleeves). Even for resin-based spot patches, the area is small, so cure time is short. This means a single spot can be fixed and the line put back in service very quickly, often in under a day’s work.
- Cost-Effective for Localized Issues: If you have just one or two problem areas in an otherwise sound pipe, it’s far more economical to do spot repairs than to line or replace the entire pipe. The cost of a repair sleeve is minimal compared to a full-length liner. You’re only addressing the trouble spots. This targeted approach can save thousands when a full line replacement isn’t really necessary.
- No Resin or Chemicals (in mechanical repair): Mechanical point repair using a locking sleeve has no resin, glue, or curing involved. This eliminates concerns about working time, shelf life of chemicals, or any sensitivity to wet environments. The sleeve can even be installed in active flow (to a degree – one might still bypass flow during install for a sewer, but a bit of water won’t ruin anything).
- Durable Materials: The sleeves are typically made of stainless steel and rubber. Stainless steel offers longevity and strength (resistant to rusting through), and the rubber provides a watertight seal. These materials are designed to last for decades in sewers. They can also handle some pressure, so they often hold up even if there’s slight pressure from groundwater. In essence, it’s a long-term fix, not a bandage that wears out quickly.
- Versatility: Spot repairs can be used for cracked sewer pipes, leaky joints, root intrusion points (after cutting roots out), small holes, or even to seal off a lateral connection. They come in various sizes to fit different diameters (commonly available for pipes around 3-4 inches up to large diameters like 24+ inches with larger systems). Also, multiple sleeves can address a longer area by overlapping. This versatility means many isolated defects can be handled without digging.
Cons of Mechanical Spot Repair
- Addresses Only the Spot, Not the Whole Pipe: While obvious, this is important – if the pipe has widespread issues (many cracks or general corrosion), a point repair will fix one spot but other areas might fail later. It’s a localized fix, so you have to be confident most of the pipe is okay. Otherwise, you might be back fixing another spot soon, which could end up costing more cumulatively than just doing a full lining in the first place.
- Slight Reduction in Diameter: The sleeve has thickness (stainless steel plus rubber), so it does reduce the internal diameter a bit at that spot. Usually, it’s not enough to affect flow significantly, but in small diameter pipes (like 4 inches) it’s something to consider – the sleeve might take maybe a quarter inch off the radius, for example. If the pipe is already prone to clogging, a protrusion could potentially snag debris (though good sleeve designs fit very tight to the wall).
- Not Suitable for Collapsed Sections: If a pipe section is collapsed or missing a chunk, you often can’t get the sleeve through that area, nor would it be able to hold if half the pipe wall is gone. Spot sleeves require enough remaining structure to grip onto. They are best for cracks, pinholes, or minor deformities, not full-on collapses or severe offsets. In those cases, you’d likely dig up that spot or use pipe bursting.
- Access Length Limits: If the problem spot is very far from an access point, there could be practical limits to pushing a packer that distance, especially in smaller lines. For example, reaching 200 feet in a small 4-inch line from one access might be challenging without sectional entry. In long pipes, sometimes spot repairs are done from multiple manholes or require sectional relays.
- Specialized Equipment: While not as heavy as lining equipment, you do need the right packer size for each diameter and a way to push/position it (often a CCTV rig or good measurement system). If a contractor doesn’t have the right size packer, they can’t do the repair until they get one. Additionally, the technique requires precision in placement – an error could mean the sleeve locks in the wrong spot, which would be troublesome to fix. Skilled operators and proper equipment are a must.
- Compatibility with Water Lines?: Mechanical sleeves are predominantly used in gravity pipes (sewer/storm). In pressurized water lines, they’re not commonly used, because a stand-alone sleeve might not hold against constant water pressure unless it’s specifically designed for that (most aren’t certified for potable water either). So for water pipes, epoxy or full CIPP is usually preferred. Mechanical spot repairs are mostly a sewer/culvert solution.
Best Use Cases for Spot Repairs
- Isolated Sewer Line Defects: Often during a sewer camera inspection, we might find one or two bad joints or a single crack that’s causing infiltration or root entry, while the rest of the line is fine. Those are perfect for point repair. For instance, a single cracked section under a slab – instead of lining the whole line or breaking the slab, we can install a sleeve just at that crack.
- Post-Lining Touch-ups: Sometimes after CIPP lining a sewer, a small section near the end or a lateral connection might still be problematic (or was not lined due to access). A point repair can be used to address spots that were left unlined or new issues that crop up adjacent to a lined section, without re-lining everything.
- Manhole or Pipe Joint Leaks: For concrete pipes or manholes where joints leak groundwater, a mechanical seal can be placed to stop that infiltration. This is an alternative to chemical grout; instead of injecting chemicals, you just mechanically seal the joint with a sleeve or expandable plug. Municipalities do this at leaking joints to reduce infiltration into sewer systems.
- Bridging Small Holes: If a pipe has a small hole (perhaps from corrosion in a cast iron pipe or a rock that punctured a concrete pipe), a patch sleeve can bridge and seal that hole effectively.
- Budget Constraints / Interim Fix: If a full pipe rehab isn’t in the budget, a spot repair can buy time by fixing the worst spot. For example, a homeowner might not afford a full $10k lining, but a $1k spot repair at the leak under the driveway might solve the immediate issue and postpone the bigger job. It’s a reasonable interim measure in some cases.
In our Phoenix-area practice, we deploy mechanical spot repairs for cases like a single root-infested joint in a sewer. We also have used small CIPP patch kits (which are like a mini version of a liner just for 2-3 feet of pipe) if the situation calls for it. Both accomplish a similar goal: fix the spot without digging. When used appropriately, a point repair can spare property owners a lot of expense and hassle, taking care of the problem area while preserving the rest of the pipe.
Comparing Pipelining Methods
With multiple trenchless options available, it’s important to compare their characteristics. The best method can depend on factors like the pipe’s condition, diameter, location, and the project budget. Below is a side-by-side comparison of the key pipelining (and pipe replacement) methods we’ve discussed, highlighting their durability, typical costs, time to complete, and disruption level:
Table: Comparison of Trenchless Pipelining Methods
| Method | Lifespan (Durability) | Typical Cost | Project Time | Excavation / Disruption |
|---|---|---|---|---|
| CIPP Lining (Inversion) | 50+ years (structural new pipe) | ~$80–$250 per foot (avg ~$160); ~$6k–$12k total for typical home line | Hours for installation, plus a few hours curing (often same-day completion) | Minimal digging – usually one access point via cleanout or small pit. Very little surface disruption (no trenching). |
| Pull-in-Place Lining | ~50 years (same materials as CIPP) | Similar per-foot cost to CIPP; often used for short (<50 ft) repairs ~$3k–$5k | Hours to install and cure (same-day for short sections) | Minimal digging – requires two access points (small pits or openings at each end). Still no continuous trench. |
| Pipe Bursting | 50–100 years (new HDPE/PVC pipe) | ~$60–$200 per foot; often $4k–$20k total depending on length | Usually completed in one day for a residential line (plus pit digging/restoration) | Moderate digging – needs entry & exit pits. Localized disruption at pits, but no trench along entire line. |
| Slip Lining | 50+ years (new pipe inside old) | Tends to be lower cost than CIPP (uses standard pipe); cost varies but generally economical for large pipes | 1–2 days for setup, insertion, and grouting (faster for simple straight runs) | Some digging – usually at insertion pit and retrieval (or manholes). Continuous pipe insertion means fewer access points than open cut, but more than cured liners. |
| Spray Epoxy Lining (SIPP) | 50 years or more (corrosion barrier) (Not structural by itself) | ~$80–$250 per foot (comparable to CIPP for similar lengths, though small pipe lining often quoted per job) | A few hours to spray and a few hours to cure (often all done in one day) | Very minimal digging – often done through existing taps or small access points. Virtually no external disruption for in-building pipes (only need access at pipe ends). |
| Mechanical Spot Repair | Decades (stainless steel sleeve is long-lasting) (Applies only to the repaired spot) | Low cost per repair (e.g. a few hundred for sleeve plus labor); very cost-effective for one-off fixes | < 1 day (each spot installation may take just an hour or two) | No digging at repair site – done via remote insertion. Only normal access needed (e.g. through a cleanout). No surface disruption at the location of the fix. |
Notes:
- Costs are broad estimates for context. Actual prices vary by region and project specifics. For instance, in the Phoenix area, many trenchless sewer lining jobs fall in the mid-to-upper end of the ranges due to hard soil and extra precautions needed, while water epoxy lining for in-home pipes might be quoted per fixture or run rather than per foot. Always get a detailed quote for your situation.
- Lifespans assume proper installation. Many trenchless solutions have been lab-tested or modeled to last 50 years or more. Some manufacturers even tout 100-year life for their liners or epoxies. Real-world longevity is continually proven as the industry has now decades of track record. In general, expect a trenchless rehab to last as long as a brand new pipe would in the same environment.
- Disruption considers surface disruption. All these methods significantly reduce disruption compared to traditional open-trench pipe replacement. Traditional methods would require digging along the entire pipe (often yard destruction or cutting through floors), which is far more disruptive than any of the trenchless methods where work is mostly confined to access points.

Trenchless Pipelining vs. Traditional Pipe Replacement
It’s also worth highlighting the key differences between trenchless pipelining (or bursting) and traditional pipe replacement (dig-and-replace):
- Excavation: Traditional replacement involves extensive digging. Yards, sidewalks, driveways, or interior floors/walls may be torn up to expose the pipe. This can mean destroying landscaping, breaking concrete, or opening building structures. Trenchless methods avoid this by working within the pipe or with small pits, preserving surface. For example, instead of a 50-foot trench through your lawn, you might just have two 3’x3’ holes at the ends with pipe bursting. Less excavation also means less labor and heavy equipment on site.
- Time and Convenience: Digging up and replacing a pipe can take several days or even weeks, especially factoring in the restoration of what was removed (replanting grass, repaving driveways, etc.). Trenchless repairs are often completed in a day or two, and there’s no lengthy reconstruction phase after the pipe work. This means less downtime for the plumbing system and less inconvenience to occupants. Homeowners don’t have to move out or avoid using facilities for long – many trenchless jobs are done with minimal service interruption (for instance, a sewer lining might be done between morning and evening uses of the sewer).
- Cost: On a purely pipe-to-pipe comparison, trenchless techniques can have a higher direct cost for materials or specialized crew. However, when you add the ancillary costs of traditional replacement (digging equipment, extra labor, permits for traffic closure, replacing concrete or landscaping), trenchless often ends up cheaper overall. One analysis showed trenchless sewer replacement ranges around $6k–$12k while dig-and-replace can be similar or higher once surface restoration is included. The larger the project scope (and the more valuable the surface that would be disrupted), the more trenchless pulls ahead in cost advantage.
- Property Preservation: With trenchless, your beautiful yard, mature trees, patio, or interior finishes remain intact. With a traditional job, even if carefully done, you’re going to see a lot of collateral damage. For businesses or public facilities, avoiding large excavations means they can often continue operation (or at least have a much shorter interruption). There’s also an environmental benefit – not digging up a pipe means not sending a bunch of busted concrete, asphalt, and dirt to the landfill and not needing new materials for restoration. It’s a more sustainable approach, aligning with modern eco-friendly construction practices.
- Technical Considerations: Traditional replacement does have a couple of advantages in certain scenarios: you can install a brand new pipe of any size or material and configure it as needed (with new slopes or route changes). Trenchless methods typically follow the path of the old pipe and might have slight limitations on size (except bursting which can upsize to a degree). If a line needs reconfiguring (e.g., lowering for better slope, or adding new connections), open-cut might be required. Also, if a site is already under construction and open, sometimes digging is just as easy. So, while trenchless is usually preferred in retrofit situations, traditional methods still have their place for new construction or when trenchless isn’t feasible.
In summary, for an existing failing pipe, trenchless pipelining offers a far less intrusive solution that is usually faster and can be cost-competitive (especially when avoiding restoration costs). Traditional replacement is now often a last resort – used when a pipe is completely inaccessible for lining (e.g., totally collapsed with no way to insert anything) or when a new design is needed. The advancements in trenchless technology have made it the default choice for many sewer and water line rehabilitations due to these clear advantages.
Frequently Asked Questions about Pipelining
Q: How long does pipelining last?
A: Trenchless pipelining methods are designed to be very durable – often just as durable as a brand new pipe. Most sources and manufacturers claim a lifespan of around 50 years or more for CIPP liners, epoxy coatings, and HDPE pipest3liningsupply.com. In practice, many CIPP liners installed decades ago are still holding up well, and lab tests suggest they can easily reach the 50-year mark and potentially much longer under normal conditions. Epoxy linings in water pipes also create a corrosion-proof barrier that can significantly extend the life of old pipes. Some epoxy and CIPP products have been tested to simulate up to 100 years of life with good resultst3liningsupply.com, but since the technology isn’t that old, conservative estimates stick to ~50 years. The key is proper installation – a well-installed liner or coating in a stable environment can last for many decades. It essentially turns an old pipe into a new pipe internally, resetting the clock on deterioration.
Is pipelining safe for drinking water pipes?
Yes, when the correct materials and methods are used, pipelining is safe for potable (drinking) water. There are NSF/ANSI 61-certified epoxy resins specifically made for lining drinking water pipes. These have been tested to ensure they do not leach harmful chemicals into the water. For example, the ePIPE epoxy used for water line coating has such approvals and can be put back in service quickly without contaminating the water. It’s important to hire professionals who use approved products and adhere to proper curing and flushing procedures. After lining, the pipes are typically flushed and the water is tested to ensure it meets safety standards. Some concerns have been raised in the past about certain epoxies leaching BPA or other compounds if not properly cured. However, modern potable water linings have addressed these issues by using BPA-free formulations and strict cure controls. Always verify that the contractor’s materials are certified for potable use. Aside from epoxy lining, other pipelining methods like CIPP can also be used on water mains with special resins – those too must meet drinking water safety standards. When done right, pipelining is not only safe for drinking water, it can improve water quality by preventing rust and lead leaching from old pipes.
Can pipelining fix collapsed pipes?
Partially collapsed vs. fully collapsed is the distinction here. If a pipe is fully collapsed – meaning it has caved in and is completely blocking flow with no open channel – then standard pipelining (CIPP, slip lining, epoxy coating) cannot be directly applied because there’s no way to insert the liner or coating through the blockage. In such cases, you typically need to either dig up that section to clear or replace it, or use pipe bursting to snake a new pipe through while shattering the old debris. However, if a pipe is only partially collapsed or deformed but still has some passage, there are instances where trenchless rehab can work. For example, a CIPP liner can sometimes bridge a small gap or void if there’s enough adjacent pipe to grip on, but this is risky and not standard. Usually, the approach is: clear the collapse first (either by spot digging that one section) then line the rest, or opt for pipe bursting to entirely replace the line. So, in summary: No, a truly collapsed pipe cannot just be lined without preliminary repair. The collapse must be opened up one way or another. Pipelining excels at fixing leaks, cracks, and minor holes – essentially, it assumes the old pipe has a continuous path to follow. Extreme damage like a collapse falls outside the scope and requires a different fix before a liner can be installed.
What’s the average cost of pipelining?
The cost depends on the method and the project specifics (length, diameter, location, etc.), but we can give some typical figures. For a residential sewer line (let’s say around 50 feet long), trenchless pipe lining generally ranges from about $6,000 to $12,000 total. That comes out to roughly $120 to $250 per foot in many cases. If the project is straightforward and shorter, you might see the lower end; more complex jobs (deeper pipes, harder access, longer runs) trend to the higher end. Pipe bursting is in a similar ballpark – often quoted around $150–$200 per foot including the new pipe, which might be slightly more than lining due to the digging of pits. For small spot repairs, the cost is much lower per spot (could be $1,000 or less for a single spot fix), but if you have many spots, costs add up and a full lining might be more cost-effective. Epoxy lining of in-house water pipes is often priced based on the number of fixtures or runs rather than per foot, but for comparison, it might equate to a few thousand dollars to line an entire home’s plumbing (still usually cheaper than a full re-pipe and with less wall damage). One should also factor in the cost savings of avoiding restoration: not having to re-landscape a yard or repave a driveway is a significant saved expense with trenchless. Every project is unique, so the best way to get an accurate cost is to have a professional assess it. They will consider the method needed, length of pipe, pipe diameter, accessibility, and local factors (like permit fees in your city). But as a rule of thumb, expect trenchless solutions to often be 20-30% less expensive than a comparable dig-and-replace, when you include all ancillary costs – and sometimes the only viable option for tricky locations regardless of cost.
Conclusion
Choosing the right pipelining method can make a world of difference in the outcome of your pipe repair project. Each technique – from CIPP liners to pipe bursting to epoxy coating – has its ideal applications, advantages, and limitations. By understanding the different methods, you as a homeowner or facility manager can have an informed discussion with your contractor and ensure you’re getting the most suitable, cost-effective, and long-lasting solution. In many cases, trenchless pipelining offers an efficient, less invasive, and equally durable alternative to digging up and replacing pipes. It’s about matching the problem to the right technology: a small pinhole leak might just need an epoxy coat, a widespread corrosion might call for a full CIPP liner, and a badly broken pipe might warrant pipe bursting.
The Phoenix Valley has a mix of older and newer infrastructure, and our soil conditions can be tough on pipes. Whether you have an old cast iron sewer in Mesa that’s cracking or a newer PVC line in Phoenix that got infested by roots, there’s likely a trenchless method that can resolve it with minimal disruption. The key is a proper inspection and honest evaluation of what’s best for your situation.
At Pipeliners, we pride ourselves on being trenchless technology experts serving the Mesa/Phoenix Arizona area. We have experience with all the methods discussed: our team primarily performs inversion CIPP linings (including the latest UV-cured linings for speed and quality) for sewer and drain lines, and we offer the ePIPE epoxy lining process for water lines to restore your home or facility’s plumbing from the inside out. We’ve successfully rehabilitated pipes in residential homes, schools, businesses, hotels, apartments, hospitals – you name it – always aiming to save our customers time, money, and headaches by going trenchless.
If you’re dealing with sewer backups, water leaks, or known pipe damage, don’t wait for the problem to worsen. The sooner you address it, the more options (and better outcomes) you’ll have. We encourage you to contact our pipe rehabilitation professionals for an inspection. We’ll use sewer cameras and other diagnostic tools to assess your pipes and then recommend the best pipelining method for your specific case. You’ll get a clear explanation (much like this guide) of why that method fits and what to expect.
Repairing pipes doesn’t have to mean destroying your property or breaking the bank. With the right trenchless method, you can rehabilitate rather than replace – often in a matter of hours – and gain peace of mind that your piping will serve reliably for many years to come. Reach out to Pipeliners today to explore your options for trenchless pipelining solutions and let us help you keep your water flowing and your worries in the rearview mirror.
Ready to See Which Pipelining Method Is Right for You?
Your sewer or water line problems don’t have to mean torn-up yards or costly downtime. The Pipeliners team has restored pipes for homes, schools, businesses, and hospitals all across the Phoenix Valley using modern trenchless technology.
Call (480) 680-9480 today to schedule your camera inspection and let our experts show you the best solution for your pipes.
With Pipeliners, you’ll get a permanent fix, completed on time and with minimal disruption, backed by a local team you can trust.
Curious to learn more in depth about cured-in-place pipe (CIPP) lining? Read here.